
Putty
Q How to download and install
This tutorial assumes you are using the Windows operating system, have already opened your favourite web browser and browsed to Google.com
Now let's learn how to download and install PuTTY
1 Type Putty in the Google search bar
2 Then click Google Search
3 Click Putty Download Page
4 You will be taken to the PuTTY Download Page.
5 Click on one of the .msi files to download putty
6 Click Save File to save the file to your computer
7 Then click on the download Putty program on your browser or downloads folder on your PC to run it, if there is a warning about opening the file then click OK.


That's it! You have successfully downloaded and launched PuTTY

8 To exit PuTTY, simply close the window
This is the end of the tutorial. You now know how to download and open Putty.
Q How to change character settings in Putty
This tutorial assumes you have already opened PuTTY
Now let's learn how to change the character settings
1 Click Translation
2 Then click here to show the character set dropdown
3 Now select the character set you'd like to use. Be sure your computer supports the character set
4 Click Session to save the new settings
That's it! The character set has been changed and saved
This is the end of the tutorial. You now know how to change the character settings in PuTTY
Q How to open a Putty session and exit a session
This tutorial assumes you have already downloaded PuTTY and located it on your desktop
Now let's learn how to open PuTTY, configure the server connection settings for SSH, and launch the command line
1 Double click the PuTTY icon to launch it
This is the PuTTY default screen. This tutorial will show how to enter your connection settings to connect via SSH with Port 22.
2 Enter the main server IP into the Host Name field.
The Port number is shown here
3 Select the connection type here
4 Then click Open
This is the PuTTY command line. Before you begin, you will need to log into the server
5 Type your username here, then press <Enter>
6 Next, type in your password, or right-click to paste it
You are now logged into your server via SSH with PuTTY. You can view what IP last logged in, and on what date. From here you can run dozens of commands to manage your server.
7 To exit, simply type Exit here, then push <Enter>...
8 Or simply close the window
This is the end of the tutorial. You now know how to log into your server using SSH with PuTTY
Q How to load, save or delete server connection settings in Putty
This tutorial assumes you have already downloaded PuTTY and located its .exe
Now let's learn how to load, save or delete server connection settings
1 Double click the PuTTY icon to launch the application
2 First, let's learn how to save connection settings
3 Type the server IP address here
4 Type a saved session name here
5 Then click Save to save the settings
We can then proceed to connect to our server
6 Now let's say we want to load a saved connection setting... let's open PuTTY again
7 Choose the saved connection setting you want...
8 ... then click Load. You will notice your server connection settings are now shown here
We can then proceed to connect to our server
9 To delete a saved session, first select the session name you want to delete here
10 Then click Delete
11 To exit PuTTY, simply close the window
That's it! The saved session has been removed from the list
This is the end of the tutorial. You now know how to load, save and delete server connection settings
Q How to start Putty in a maximized window
This tutorial assumes you have located PuTTY, and starts from your desktop
Now let's learn how to start Putty "maximized" so the command line window is as large as possible
1 Right click the PuTTY icon
2 Then click Properties
3 Once the Properties window is open, be sure the Shortcut tab is selected
4 Click Normal Window
5 Then select Maximized
6 Click Apply
7 Then click OK
This is the end of the tutorial. You now know how to configure PuTTY so it launches in a maximized window
Q How to create a log file of your Putty session
This tutorial assumes you have already downloaded PuTTY and located its .exe
1 Double click the PuTTY icon to launch the application
Now let's learn how to create a log file of your session
2 Click Logging
The logging settings are listed here on the right. Let's demonstrate how to save a log file to your desktop
3 Click All session output
4 Leave Putty.log as the log file name
5 Then click Browse to choose the save location
6 Ensure Desktop is selected here...
7 Then click Save
8 Ensure 'Ask the user every time' is selected... then click Open to begin your session
9 Type your username, then push <Enter>
10 Type your password, then push <Enter>
Now let's type a simple shell command. PuTTY can log dozens of commands within your session
11 Type a simple test command here, then press <Enter>
12 Now type Exit, then push <Enter> to close PuTTY
We can see that a log file has been saved to the desktop
13 Now let's open the log file... double click Putty
The log file contains all commands entered, great for saving your sessions to review at a later date
This is the end of the tutorial. You now know how to create a log file of your PuTTY sessions
Q How to clean up your Putty sessions
This tutorial assumes you have already opened your Windows command line
Now let's learn how to clean up your Putty sessions from the Windows command line
1 Type the path to your Putty.exe here
2 Then type -cleanup here, then press <Enter>
3 Click Yes to clear your sessions
That's it! The PuTTY sessions have been cleared or cleaned up
This is the end of the tutorial. You now know how to clean up your PuTTY sessions
Q How to start a SSH session from the command line
This tutorial assumes you have already opened your Windows command line
Now let's learn how to start a SSH session from the command line
1 Type the path to Putty.exe here
2 Then type the connection type you wish to use (i.e. -ssh, -telnet, -rlogin, -raw)
3 Type the username...
4 Then type '@' followed by the server IP address
5 Finally, type the port number to connect to, then press <Enter>
A PuTTY session has now been opened
This is the end of the tutorial. You now know how to start a PuTTY session via command line
Q How to copy and paste to and from a PuTTY window
It may not be obvious to you, but it is possible to copy and paste to and from a PuTTY window. This tutorial will show you how to do that
Copying and pasting in PuTTY is very easy, but different from the way it's done in most other programs
1 You'll need to be logged in to a PuTTY session before you begin
2 All you have to do is left click and drag to make a selection
As soon as you let go of the mouse button, the selection is instantly copied to your clipboard and ready to be pasted
3 Simply click off of the selection to deselect it
4 Now, let's paste the selection into another window. For this tutorial, we'll just use a Notepad window that we already have open
5 Right click, then Paste
The selection has been copied and pasted successfully
Now, let's try copying and pasting an SSH command we've stored in a different Notepad window
6 Right-click and Copy
7 Return to PuTTY
8 Simply right-click to paste
9 Press Enter to execute the command
You can also select and copy a rectangular region in PuTTY. For our purpose, this is useful to copy just the filenames in this directory listing
10 Hold down ALT, then click and drag from the top left corner to the bottom right
11 Switch back to Notepad
12 Press CTRL+V to paste
The rectangular region you copied has been pasted successfully
This completes the tutorial. You should now know how to copy and paste to and from PuTTY
Q How to increase the scroll buffer size in PuTTY
You may have noticed that PuTTY does not allow you to scroll up very far
This can become annoying when running programs that have lots of output you might need to scroll through and review
Let's look at an example
We have already logged in to one of our saved SSH sessions
One command that can sometimes produce a lot of output is ls -- the command to list a directory's contents
1 Type ls -l / to list the contents of the root directory. Remember -- press Enter to execute a shell command
2 Now, type the command shown to list the contents of all directories contained by the home directory
3 Scroll up
Here is the command we just typed
Above that, the output of the previous command
4 Scroll up a bit more
As you can see, we've reached the top of the scrollbar, and still can't see the first command we typed; it's just barely out of range
5 Let's increase the size of the scroll buffer. Close this session and re-open PuTTY to the configuration window
6 Select the session from the list, then click Load
7 Then, go to Window
8 Enter a higher value for Lines of scrollback. We'll change ours from 200 to 20000
9 Return to the Session category
10 Click Save
11 Finally, press Open
12 Now, log in normally, as seen earlier in this series
Once logged in, let's test out the new scroll buffer size
13 Type the command from before, several times. End each line with a shell comment as shown, thus marking each one
Watch the size of the scrollbar
14 Now, scroll up
Here's the first command. Clearly, our change worked!
This is the end of the tutorial. You now know how to increase the scroll buffer size in PuTTY
Q How to change PuTTY's appearance
If you're going to be using PuTTY a lot, you'll probably want to customize its appearance to what you like best. PuTTY has a number of settings that allow you to do this
1 Once you have PuTTY open, load a session from the menu
2 Then, go to Appearance
The first settings here allow you to adjust the cursor's appearance
3 The default is Block, but you can change it to one of the other two if you want. We'll pick Vertical line
4 Click this checkbox to make the cursor blink
5 Now, for the Font settings
6 Click Change...
7 Select a new font from the list. Only monospaced fonts will show up; these are fonts whose characters are all the same width
8 Change its style, or just leave it set to Regular
9 Adjust the size to something a bit bigger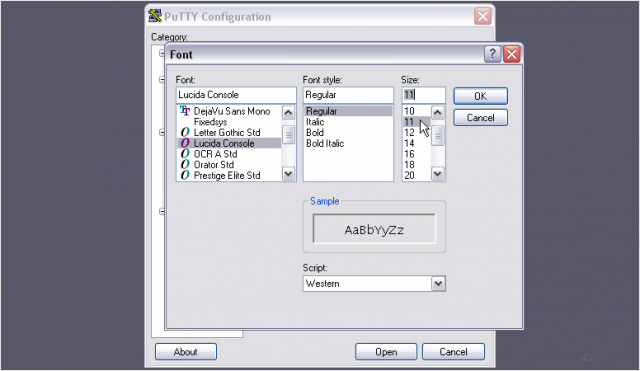
10 Then, click OK
Notice... the font name and size listed here has changed
11 Mark this checkbox to hide the mouse pointer when typing
12 Last on this page, you can adjust the appearance of the window border. Use this value to control the size of the Gap between text and window edge
13 To display a sunken edge border, click this checkbox
14 Now, go to Colours
Let's change the background and foreground colours
15 Hit Modify
16 Choose a Basic colour, or pick a custom colour using the tool at right. Let's use white
17 Click OK
colour
19 We'll pick Black for this
Feel free to change any other colours you want
20 Now, return to the Session page
21 Save our changes to the session
22 Then, press Open
You should notice that this looks quite a bit different than it does with the default settings
That cursor colour is a little bright on a white background. You can change it with the Colours settings, where we just were
23 Log in
24 Test out a command
That's it! You now know how to change PuTTY's appearance
Q How to change the bell style and settings in PuTTY
A terminal bell is a sort of notification produced by an SSH server when some things happen or appear, such as an error message or global announcement
By default, PuTTY will use the Windows system ding whenever it's told to signal a bell. This can sometimes be annoying, especially if something's triggering the bell repeatedly
To change the bell style and settings, first, choose a saved session from the menu
1 Click Load
2 Then, go to Bell
3 First, you can set the style of the terminal bell
4 Let's change ours to Visual bell, which will cause the window to flash instead of making a sound
You can also change it to None to disable the bell completely, force it to beep using the PC speaker, or choose a custom sound file to play
Next section. With the buttons above, you can make the taskbar and window title notify you if you receive a bell when the window is not in focus
Flashing will cause the taskbar to blink, whereas Steady will display a solid colour
The bottom section allows you to disable the bell temporarily when over-used, as defined by the settings. The defaults here should work fine
5 Return to the Session panel
6 Be sure to save your session, or else the settings won't stick
Then, let's test out the bell
7 Log in
One way to trigger a bell is by pressing Backspace at the beginning of a line
The window will flash momentarily to represent a bell signal
This tutorial is now complete. You now know how to change the bell style and settings in PuTTY