
CLOUD SERVERS
You can access your Cloud Servers form the "left hand" or "main screen" navigation

You can manage your cloud server by clicking the manage option as shown, this will allow you to access the sections shown below

Q Server Details
Information about your server is listed in this section

You can view the password for your server by clicking on "SHOW"

If you have purchased additional IP addresses these can be viewed by clicking the "+" beside the master IP

If you have purchased a control Panel the login details can be viewed by clicking "Login Details"


Q Start & Stop Server
By default your server will be started, to stop it click "Stop Server" in the "Manage Your Server" Section

When your Server is in a "STOP" status you can start it back up by clicking "Start Server" in the "Manage Your Server" Section

Q Reboot Server
You can reboot your server by clicking "reboot server" from the "Manage your Server" Section

Q Rebuild Server
You can rebuild your server by clicking "Rebuild server" from the "Manage your Server" Section
Clicking this will rebuild the server to its initial state

Q Shut Down
The Server can be fully shut down by clicking "Shut Down Server" from the "Manage Your Server" section

Q Recovery Mode
The Server can be fully shut down and restarted in "Recovery Mode" by clicking "Start Up in Recovery" from the "Manage Your Server" section

Q Reconfigure Server
The Server can be reconfigured by adding additional vCPU, IP addresses, RAM or memory. Click "Reconfigure Server" in "Manage Your Server" section and you will be directed to the "Configurable Options" Section.


Q Server Email Address
Your cloud server requires a unique email address which we have set as customernumber@servermanagement.cloud This currently forwards to the contact email address on your account. To change this, enter a new address in the box and click "Update"

Q Server Password
You can reset the password for your server by entering a new password and click "Update"

Q Control Panel Login (PLESK)
Your "PLESK" login information can be found in the "Additional Tasks (Control Panel Login Details TAB)" section, you can view the password by clicking "SHOW"

Help guides on "Plesk Setup" and "using Plesk" can be viewed by clicking "View Guides" as appropriate

Q Control Panel Login (cPanel)
Your "cPanel" login information can be found in the "Additional Tasks (Control Panel Login Details TAB)" section, you can view the password by clicking "SHOW"

Help guides on "cPanel Setup" and "using cPanel" can be viewed by clicking "View Guides" as appropriate

Q Firewall Management (Adding a rule)
Click "Firewall Management" from the "Additional Tasks" Section

From the "Add a Firewall rule" section input your new Firewall rule and click "Add Rule"

You will be presented with a "Success" or "Failure" message. If your rule is a success you need to apply it by clicking "Apply Firewall Rules"


You will be presented with a "Success"

Q Firewall Management (Editing a rule)
Click "Firewall Management" from the "Additional Tasks" Section
Use the and icons beside the rules in place to set the order they run
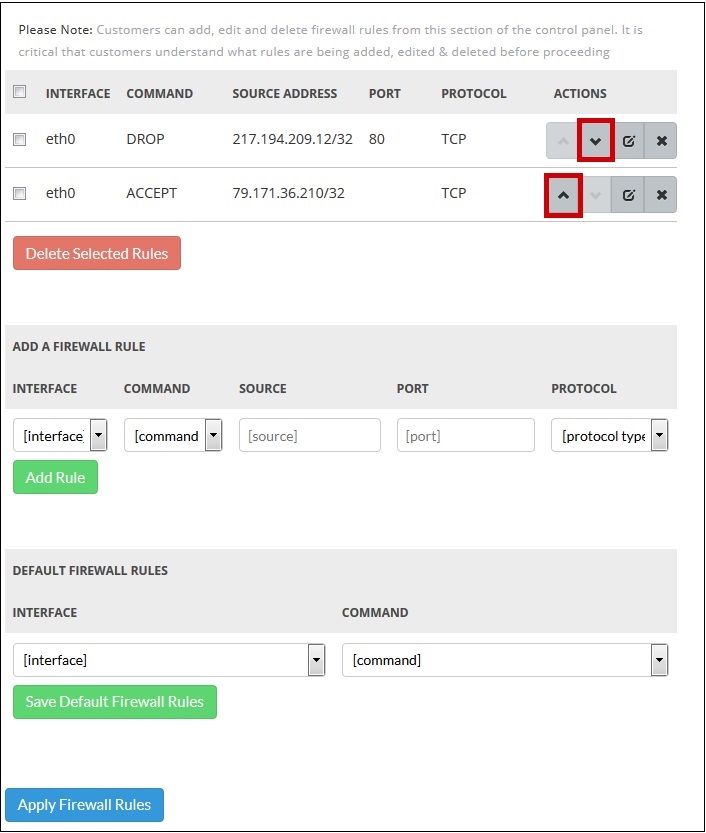
click the button beside the rule you want to edit

Make any changes and click the ✔

You will be presented with a "Success" or "Failure" message. if your rule is a success you need to apply it by clicking "Apply Firewall Rules"
You will be presented with a "Success"
Q Firewall Management (Deleting a rule)
Click "Firewall Management" from the "Additional Tasks" Section
To delete a specific rule click the button beside the rule you want to delete

To delete rules in bulk check the boxes beside the rules you want to delete and click "Delete Selected Rules"

You will be presented with a "Success" or "Failure" message. If your rule is a success you need to apply it by clicking "Apply Firewall Rules"
You will be presented with a "Success"
Q Firewall Management (Setting Default)
Click "Firewall Management" from the "Additional Tasks" Section
Select your "Default" rule and click "Save Default Firewall Rules"

You will be presented with a "Success" or "Failure" message. If your rule is a success you need to apply it by clicking "Apply Firewall Rules"
You will be presented with a "Success"
Q CP Usage Graphs
Click "CPU Usage Graphs" from the "Additional Tasks" Section

Info on your CPU Usage will be displayed in this section in a "Graph" format

You can "Download" and "Print" the Graph by clicking the "Burger" Navigation

Q Configurable Options
Click "Configurable Options" from the "Additional Tasks" Section

You will be presented with the options of your server that are configurable

Contact sales to purchase additional "vCPU", "IP Addresses", "RAM" and "Memory" by calling the number on screen or by clicking "Raise Ticket"

Q Activity Log
A full activity log of actions performed on the server will be shown in the "Activity log" Section
