
You can access your email management from the "left hand" or "main screen" navigation

To manage email you can click on EDIT beside the domain

Q Add a mailbox
Click "Add Address"

Enter a name for your mailbox and click "normal mailbox"

Enter storage for your mailbox

If your package allows it, select whether you would like your mailbox configured as POP or IMAP

Enter a mailbox password and click "Create Address"

Once your mailbox is successfully created You can access our Intelligent Email Client & Mobile Setup Guides by clicking "View Guides", These give information on configuring your mail client or mobile device. Clicking this link will pass your email details through to the guide so you know exactly what to input

Q Add forwarding
Click "Add Address"
Enter a name for your forwarding address and click "forwarding address"

Enter a target destination and click "Create Address"

Q Add a mailing list
Click Add Address
Enter a name for your mailing list and click "mailing-list"

Enter a mailing list recipient and click "add more recipients"

Enter more recipients and continue to click "add more recipients" until all members have been added, (if you make an error click the cross beside the invalid address)

When complete click "Create Address"

Q Add a mailbox alias
Click "Add Address"
Enter a name for your alias and click "alias address"

Select the name mailbox or forwarding address you want to create the alias for and click "create address"

Q Set your mail box up in a mail client or mobile device
Click "Edit" beside the mailbox you want to set up

The "Info" tab gives the required settings for your mail client or mobile device

Click on "View Guides" and your details will be passed through to our intelligent guides advising what information to put where

Q Change your mailbox type from POP - IMAP or IMAP - POP
Click "Edit" beside the mailbox you want to change
Select the "Change Mailbox Type" tab and Click "Change To IMAP" or "Change To POP" as appropriate

When complete you will be presented with a link to
our setup guides for changing your email client from
POP-IMAP or IMAP-POP
You can view the static guides here

Q Manage quota
Click "Edit" beside the mailbox you want to manage quota for
Select the "Manage Quota" Tab, enter a new quota and click "Update Quota"

Q Change mailbox password
Click "Edit" beside the mailbox you want to change the password for
Select the "Change Password" tab, enter a new password and click "Update Password"

Q Add forwarding to a mailbox
Click "Edit" beside the mailbox you want to add forwarding to
Select the "Forwarding" tab, enter a target forwarding address and click "Add Forwarding"

You will be presented with a warning advising you will lose all mail in the mail box, if you are happy with this, click "Yes Insure, Add Forwarding"

Q Change the destination of a forwarding address
Click "Edit" beside the forwarding address you want to change

Enter a new target destination and click on "Change Forwarding"

Q Change a forwarding address to a mailbox
Click "Edit" beside the forwarding address you want to convert to a mailbox
Click "Change to Mailbox"

Q Add mailing list members
Click "Edit" beside the mailing list you want to add members to

Select the "Add Recipients" tab and enter a recipient, and continue to click "add more recipients" until all members have been added, (if you make an error click the cross beside the invalid address)

When complete click "Save List"

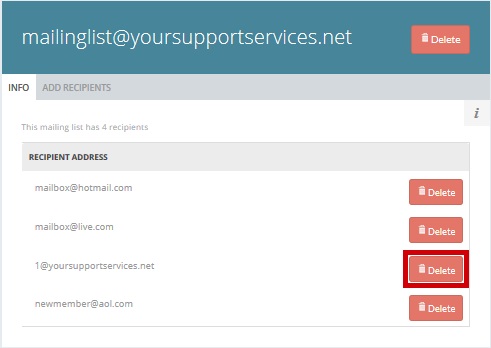
Q Delete mailing list members
Click "Edit" beside the mailing list you want to remove members from
Click "Delete" beside the member you want to remove from the mailing list
Q Delete an alias address
Click "Edit" beside a mailbox or forward with the alias you wish to remove

Select the "Manage Aliases" tab and click "Delete" beside the alias you wish to delete

Q Delete a mailbox, forwarding address or mailing list
Click "Delete" beside the mailbox, forwarding address or mailing list you wish to delete

Q Email Security – DKIM
You can enable DKIM by clicking “Enable DKIM” from the email security section of your control panel
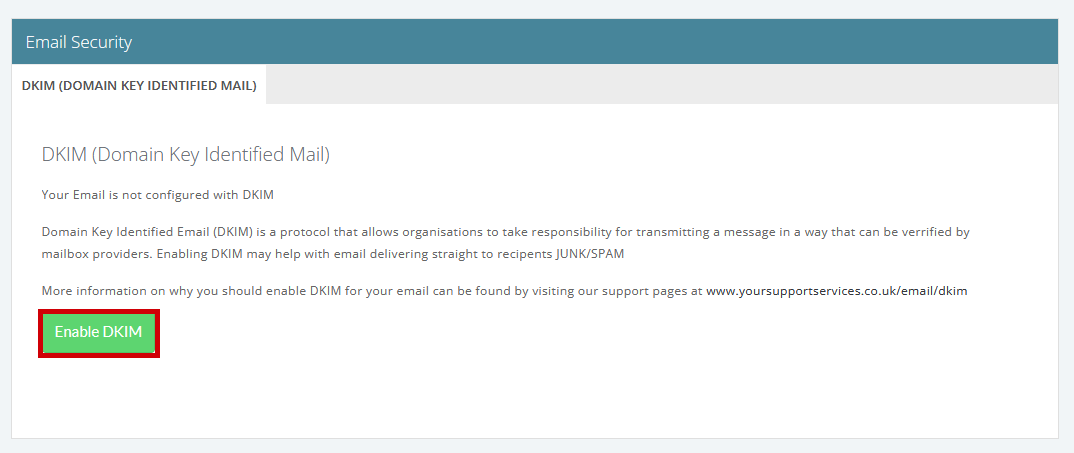
More information on DKIM can be found by visiting https://www.yoursupportservices.co.uk/email/dkim
Q Email Security – DMARC
you can add DMARC records by clicking "ADD DMARC" from the email security section of your control panel

More info on DMARC can be found by visiting https://www.yoursupportservices.co.uk/email/dmarc
Q Email Security – SPF
you can add SPF records by clicking "ADD SPF" from the email security section of your control panel

More info on SPF can be found by visiting https://www.yoursupportservices.co.uk/email/spf