
HOSTING
You can access your hosting form the "left hand" or "main screen" navigation

To manage a domain you can click on EDIT beside the domain

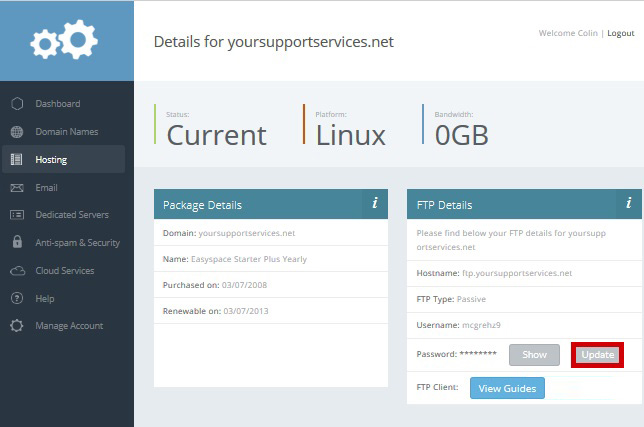
Q FTP details
These can be found on the top right hand panel of the Edit Hosting Screen

You can view your FTP Password by clicking "Show"

Q FTP password reset
Within the FTP Details Section click "Update"
Enter a new FTP PASSWORD and click "Update Password"

Q Change PHP Version
You can upgrade to PHP v8 (or revert to your previous version) by clicking "Upgrade to PHP8"

Confirm you want to proceed

To check PHP version for subdomains click "Advanced PHP Options"

Enter your subdomain and click "Check PHP Version"

Click "Upgrade to PHP 7"

Q Intelligent FTP client guides
You can access our Intelligent FTP Client Setup Guides by clicking "View Guides", These give information on installing, Connecting to a 3rd party client as well as uploading your website. Clicking this link will pass your FTP details through to the guide so you know exactly what to input where.

You can access static guides Here
Q Add a new database
To add a new database click "Add Database" database from the Databases tab

Q Database details
These can be found under Existing Databases from the Databases tab

You can view your database password by clicking "Show"

Q Connect to PHP MY ADMIN
PHP MY ADMIN can be used to administer your databases. You can connect to our version by clicking PHPMyAdmin

Q Reset database password
Click on "Change Password"

Enter a new password and click "Update Password"

Q Delete a database
Click the "X" at the top right of the database you wish to delete.

Q Access webstats
If you use WINDOWS hosting website stats are not available
You can access the webstats for your domain by clicking on "View Stats in a new window" on the Stats and Promotions Tab

Q Access backups
You can access the Backup and Restore for your domain by clicking on "Manage Backups" from the Backup and Restore Tab

Q Manage backups
Select whether you wish to manage "Hosting/Domains" or "Databases"

If you wish to restore the content of your website or database click "Restore" beside the backup you require

If you wish to download the content of your website or database, click "Download" beside the backup you require. You will then be sent an email with the download link.

Q Caching (Website Cache)
You can Clear your website Cache by clicking "Clear Cache Now" on the Security and Performance Tab
![]()
You can Disable your website Cache by clicking "Disable Cache Now" on the Security and Performance Tab

Q Enable Secure Hosting (SSL)
You can Enable/Disable Secure Hosting by clicking "Enable Secure Hosting" on the Security and Performance Tab

Q Enable HTTPS Redirect
When Secure Hosting is enabled you can force http - https redirect by clicking "Enable Secure Hosting" on the Security and Performance Tab

Q SubDomains
You can add a subdomain to your webhosting by entering the subdomain of your choosing and "Create Sub Domain" on the Sub Domains Tab

Q Add Password Protection
To Password Protect a specific folder in your webspace enter the folder name and credentials in the password protection section and clicking "Add Password Protection" on the Security and Performance Tab

Q Buy Extras
You can purchase a range of hosting addons from the Purchase Extras Tab

Q Application Installers
Select which application you want to be installed by selecting it from the dropdown and clicking "Install Application Now" on the Applications Tab

Q Wordpress
If you have a Wordpress package your initial admin details will be found in the Wordpress Tab
